General purpose routines are convenient but also relatively inefficient. SAM has plenty of RAM, so why not trade some of it for fast code tailored to each use?
I’m targetting SAM’s MODE 4 for now, which is 4 bits per pixel. I’ve also started with the simplest case of full unclipped routines, which must not overlap the screen edges. More complex cases (including edge clipping and block masking) may be added in the future.
Improvements
There are a number of wasteful areas in general purpose routines that can be improved by custom code generation:
1) Background drawing
This is probably the biggest loss in traditional routines. They draw a full rectangular area since they have no knowledge of the content. Drawing a solid rectangle takes just as long as a sprite containing a single set pixel. Attempting to adapt to the content can improve the best-case times, but usually at the cost of slower worst-case.
Generated code can completely ignore background regions and mask only known partial bytes (where only one pixel of a byte pair is used). If masking isn’t required the display data can be written directly, saving even more time.
2) Data fetches
Too much time is spent fetching data from memory and advancing pointers. Each byte fetched will typically involve LD A,(DE) [12T] followed by INC DE [~8T] (or INC E [4T], if the source data alignment can be guaranteed). Masked drawing is worse as we must fetch two additional bytes — the mask value and the current display byte to mask.
Reading a data byte as an immediate value is faster than an explicit memory fetch, and doesn’t require a register pair pointer or pointer advance. Using LD (HL),n [16T] to write a byte is faster than fetching the byte above and advancing the pointer, so we’re already saving time. Masked drawing has similar gains, with immediate values used for AND n; OR n.
If the same immediate value is used multiple times it’s better to load it into a spare register with LD r,n [8T] and use the register version of the instruction. That means using LD (HL),r [12T] instead of LD (HL),n [16T]. Using the same immediate value twice gains back the overhead of loading the register with a value, and for each additional use we save 4T. Once two different values are needed we can save a further 4T by loading them both into a register pair with LD rr,nn [12T]. With two spare register pairs we can cache up to 4 values for fast access.
Generated code can pre-cache common values in spare registers, and use them in place of immediate values. More on this later.
3) Display navigation
There’s no need to move the display pointer to unused/background areas of the sprite. If a sprite consists of only two pixels, at the top left and bottom right, the display pointer should be moved only once, at the point the second display byte is ready to write.
The instructions used to change the display pointer depend on how far it’s being moved, whether 8-bit carry is required, and if there are any free register pairs. Offsets up to 4 bytes are fastest using INC r [4T each]. Larger offsets without carry are faster using a sequence of LD A,L; ADD A,n; LD L,A [16T] or LD A,L; SUB n; LD L,A [16T], depending on the direction.
Changing from even/odd to odd/even lines may require carry into the high byte. To do that the previous instruction sequences must be followed by ADC A,H; SUB L; LD H,A [+12T] or LD A,H; SBC A,0; LD H,A [+16T], respectively. Alternatively, if a spare register pair is available we can perform the entire adjustment with LD rr,nn; ADD HL,rr [20T], saving 8-12T over the 8-bit versions. Negative offsets should still use ADD HL,rr to avoid needing to know the carry state for SBC HL,rr.
The generated code can avoid all unnecessary movement and recognise the best method to move the pointer for each situation (very few situations require carry).
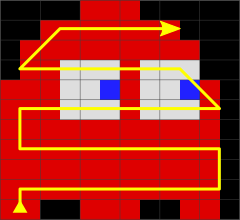
4) Drawing order
At 128 bytes per line for MODE 4, moving to the next line down requires adding ~128 and carrying any overflow. It’s usually slightly less as we’ll want to move back to the left edge. However, there’s we don’t need to draw in line order, as long as the final result is the same.
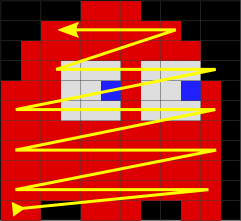
Adding 256 to the display pointer advances two display lines and requires only an INC H [4T], and no carry. Rather than moving back to the start of the next line it’s more efficient if we stay in the same horizontal position and draw the next line in the opposite direction. If the sprite has near vertical edges, we will be close to the correct horizontal position for the next line.
Generated code can draw even lines of the sprite in a downwards direction then odd lines in an upwards direction, moving right and left in a zig-zag pattern. This both simplifies pointer adjustment code and saves time.
The switch from even to odd lines is +/-128 bytes, depending on whether the sprite has an even/odd height. The even-odd switch may require overflow/underflow, depending on whether we started drawing at an even or odd y position. We versions of the code for even or odd y positions, but the code to decide which to use would be slower than always carrying!
We need just a single drawing routine for any y position. Shifts in x position still requires separate routines as the data values (and mask positions/values) will be different.
Value caching
The drawing method described above uses only HL for the display pointer, leaving BC and DE free for quick-access cache values. Deciding which data values to cache in registers has been one of the more challenging parts of this project. Anywhere an immediate value is used could potentially be replaced by a register to save 4T. This applies to the image and mask data, the offsets to move around the display, and even the literal 0 in SBC A,0 to carry 8-bit underflow. The values and the order they’re needed is constant for a given routine, and it’s this value stream that we optimise for register caching.
I started with a naive approach of counting the frequency of values, and only caching the most common. This does help, but if there are many different repeated values there is inevitable waste. This was improved by changing the cache when it contained values that were no longer needed. However it could still be fooled into caching a single occurrence of the value early in the stream, unnecessarily hogging a register.
My current approach uses a MRU list to track the values seen and their frequency. This gives a window that monitors the current value needs, which can change as we move through the image. Once there are enough recent values with a frequency >= 2 they’re ready to be assigned to the cache.
Each time a new cache set is generated any differences from the current cache values are applied. The frequency of all values seen before the cache point are cleared, since they no longer candidates — this avoids spread out values hogging registers. Values already in the cache also retain their original register assignments, to minimise the code needed to update them. If more than 2 values are to be updated, and a spare cache register pair is available, they’ll be assigned as a pair.
At the point of use, values are fetched from the pre-processed value stream. It returns either a literal value or the register containing the value, which is used as the operand of the instruction being generated. The value stream also appends any LD instructions needed to update the cache registers before their use.
Additional Routines
As well as drawing sprites we need to be able to remove them from the screen. If we’re using masked drawing we’ll probably want to save and restore the display under the sprite. If we’re using unmasked drawing the background is usually blank, so we can just draw the background colour over the sprite to remove it.
There are also different approaches to drawing/saving/restoring/clearing, which depend on the size, shape and complexity of the sprite. Rather than always using the same code it makes sense to generate all available options for the task and use the fastest. Memory poke and stack methods each have their strengths, and the choice may not be as clear-cut as you think!
I’ve implemented a selection of starter routines for unclipped drawing. They can be tweaked if improvements are found, and additional routines can be added for different techniques or features. They share the same display pointer adjustment logic and can use value caching where appropriate. This reduces the amount of routine-specific code needed for each function.
Starter Routines
Unmasked drawing (poke)
Data is written to the display using LD (HL),r or LD (HL),n, depending on whether the value is available in a cache register.
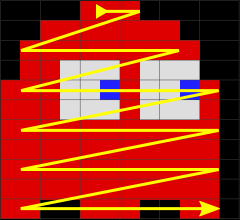
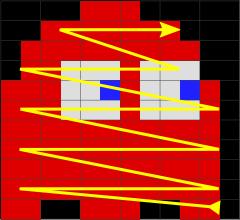
Even lines are written downwards then odd lines upwards, both in a zig-zag pattern:

Masked drawing (poke)
As above but partial display bytes are masked using AND (HL) to preserve the other display pixel, before the other pixel is merged using OR r or OR n. This gives pixel-perfect drawing over any background image.
Save (peek then push)
Display navigation as above but data is read from the display using LD E,(HL) and LD D,(HL), then pushed to a sprite-specific buffer using PUSH DE.
Saving covers display data affected by both even and odd x positions, which will usually be very similar. This avoids the need for separate even/odd routines for saving/restoring.
Restore (pop then poke)
The reverse of saving above. POP DE retrieves saved data, which is written back to the display using LD (HL),D and LD (HL),E.
Since the stacked data is removed in reverse order we must also navigate the display in reverse order. Care also needs to be taken to skip the first byte if the total number of bytes saved was odd.
Save (LDI)
Copy data from display to save buffer using LDI [20T per byte], skipping any unused source areas.
Automatic HL and DE advancing prevents us zig-zagging, so lines are saved in left-to-right order. We still copy even lines downwards then odd lines upwards:
Restore (LDI)
As above but using HL for the save buffer pointer and DE for the display pointer.
Clear (poke)
The same as unmasked drawing, but always writing a zero byte for image data. The minimal use of cache registers leaves DE free for a faster switch between even and odd lines.
I originally had a custom routine that used LD (HL),A to clear, with an initial XOR A. It only saved 4T over what the draw routine generates, and only when navigating within the sprite didn’t need A for non-carry pointer changes. I didn’t feel it was worth keeping for such a small gain.
Clear (stack)
Navigate to the last used byte on each used line, then use LD SP,HL to set up the stack, PUSH DE is used to clear back to the first used pixel on each line.
If the line contains an odd number of pixels the first byte is written using LD (HL),E, and the rest with the stack. No byte skipping is attempted as PUSH DE costs the same as moving SP back two bytes. We still process even lines down then odd lines up, but work right-to-left:

Clear rect (poke)
Clear a rectangular area the size of the sprite using LD (HL),A to write and XOR A to set the initial zero value. Added only for comparison with sprite-specific code.
Clear rect (stack)
As above but using PUSH DE to clear the rectangle. This is one area where the stack approach is generally faster than poking memory.
Generated Code
The script output is a Z80 assembly text, with label names generated by combining the function with the sprite names passed to the script. For example, save_ghost saves the display under the sprite ghost. Missing labels use an auto-generated spriteN name, where N is the zero-based index of the tile in the image.
This list shows the available routine prefixes and their register inputs:
masked_- HL=sprite coords, with H=ypos, L=xposunmasked_- HL=sprite coordssave_- HL=coords, DE=save bufferrestore_- HL=sprite coords, DE=save bufferclear_- HL=sprite coordsclear_rect_WxH- HL=sprite coords
Notes:
- all routines use AF/BC/DE/HL, leaving IX/IY and alternate sets untouched.
- the save buffer size is sprite-specific, but I recommend providing the full size in bytes.
clear_rect_WxHlabel includes width and height, so generate only one for each size!
Demos
I’ve created some demo projects to show basic and typical use cases. Click an image to download a zip containing the demo source, including generated code and bootable disk image.
Demo 1
Simple example drawing and removing a sprite.

Command-line used:
tile2sam.py sprite.png 11x11 --code masked,save,restore --names ghost --pal --low
Here’s what each parameter does:
sprite.pngis the input image, in this case containing just a single sprite.11x11is the size of the sprite tile.--code masked,save,restoregenerates code for masked drawing and save/restore.--names ghostassigns a name to the sprite for code labels.--palwrites the palette tosprite.pal.--lowgenerates code targetting the display in low memory at address 0.
Output is written to sprite.asm, matching the image name. Use the -o option to specify a different file. Adding -a will append to any existing output file, if you want the output from multiple invocations in one file.
Demo 2
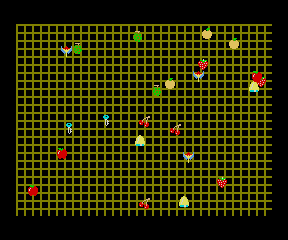
Animate masked sprites over a background image (50Hz).
Command-line used:
tile2sam.py -q sprites.png 12x11 --code masked,save,restore --names cherry,strawb,orange,bell,apple,grapes,galax,key --pal
This breaks down into:
-qsupresses the chatty output during code generation.sprites.pngis the input image containing 8 sprites of the same size.12x11is the size of each sprite tile.--code masked,save,restoregenerates code for masked drawing and save/restore.--names cherry,strawb,orange,...assigns names to each sprite for code labels.--palwrites the palette tosprites.pal.
Demo 3
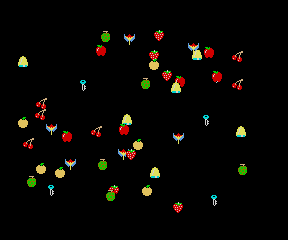
Animate unmasked sprites over a black background (50Hz).
Command-line used:
tile2sam.py -q sprites.png 12x11 --code unmasked,clear --names cherry,strawb,orange,bell,apple,grapes,galax,key --pal
Clearing the sprites is much faster than save/restore, allowing us to draw twice as many.
Source Code
You can find the updated tile2sam.py script and demo source code on the tile2sam project page. You’ll need Python 3.6 or later and pyz80 in your path to assemble the output to a disk image.
Please let me know if you encounter any issues or have trouble using it. I’m also open to feature requests for future versions.
Special thanks to Chris Pile for his feedback during development.
]]>