Vista icon update
Vista includes support for 32-bit colour icons up to 256x256 pixels in size — something Mac OS X has enjoyed for a while. They’re designed for high-DPI displays so they look too big on normal 96 dpi displays, but they do scale well to give quality smaller icons for normal use.
The Mac version of SimCoupe started with the 48x48 Windows XP icon scaled up to 256x256, which looked very out of place along side the 3D icons used by other applications. I wanted a decent new icon for the SimCoupe 1.0 release but didn’t have the artistic talent to draw my own. Rendering a 3D version seemed the way to go, so I downloaded the free Blender package and got started.
Creating the basic robot shape wasn’t too difficult, with simple hemispheres for the head, body and feet. The eyes and aerial were bezier curves pulled into shape and then filled. I was lucky enough to find a hand model in an animation tutorial, which saved me a lot of work creating my own.
The neck, arms and legs were created using the screw tool. However, the arm segments were straight and needed to hang out from the body and round to the hands. Getting them to curve took weeks of experimentation, but was eventually solved using armatures. Inserting bones into the arms meant I could bend them to the shape I wanted in pose mode, with inverse kinematics (IK) doing all the work. It’s not perfect, with a few kinks visible if you look closely, but it’s good enough!
To ensure the robot was symmetrical I built only the left half, with the right half created by cloning and mirroring it. The images below show the left half as wireframe and filled, and the completed robot in wireframe mode:


The final step was lighting, and I found another tutorial to help with that. I used standard positions to evenly light the scene, knowing they could easily be changed later to fit any user interface guidelines for icon lighting. The render took only a couple of seconds, and was saved out as a PNG image, preserving transparency where needed.
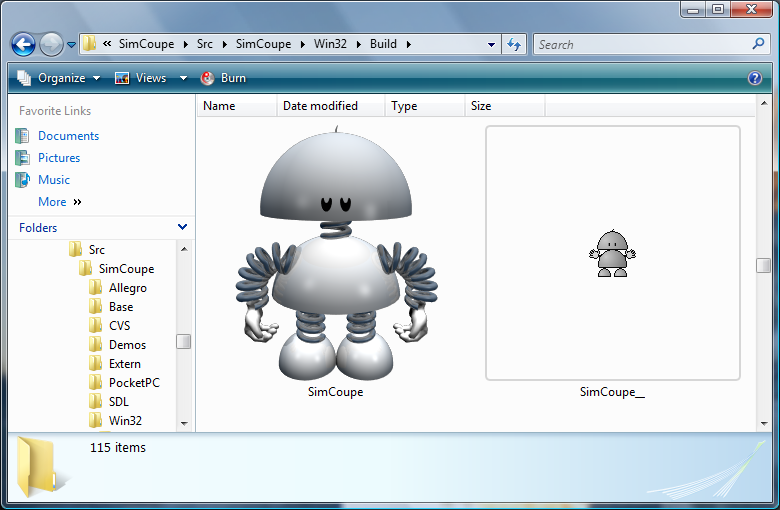
Here’s the final 256x256 image:

At this point I created the Mac icon, importing directly from the PNG render to create the .icns file. For the Vista version I needed to merge the new icon into the existing SimCoupe icon file, so the OS could choose which one to use. XP wouldn’t recognise the new format and fall back to using the original smaller versions, which was perfect.
Rather surprisingly Vista uses the PNG format to store the new icon images in the file, and for a 256x256 32-bit image that meant a huge space saving compared to the old format. This downside was that none of the existing tools would recognise the new icon format, and that included the resource compiler used to build the SimCoupe executable! A 3rd party tool (ReplaceVistaIcon) came to the rescue, allowing the new icon to be injected into the executable after the build.
Here’s how the new icon compares to the original 48x48 XP icon, using Vista’s large-icon view:
Vista doesn’t use the new icon for everything though, falling back on the old icon in some situations (including the task list). Hopefully that’s something I can improve as I learn more.